不同设备的对时精度,是衡量多台设备经过 NTP/PTP 等对时协议同步后,时间一致性的量化指标—— 本质就是设备之间(或设备与基准时钟之间)的时间偏差大小,偏差越小,对时精度越高,多设备在执行协同任务时,时间维度的一致性就越强。
Table of Contents
对时精度测试
核心前提
基准时钟:多设备通过 NTP/PTP 同步的统一时间参考。
同时曝光:多设备机在基准时钟的同一时刻Ttrigger收到触发信号,开始曝光。以两台设备为例:
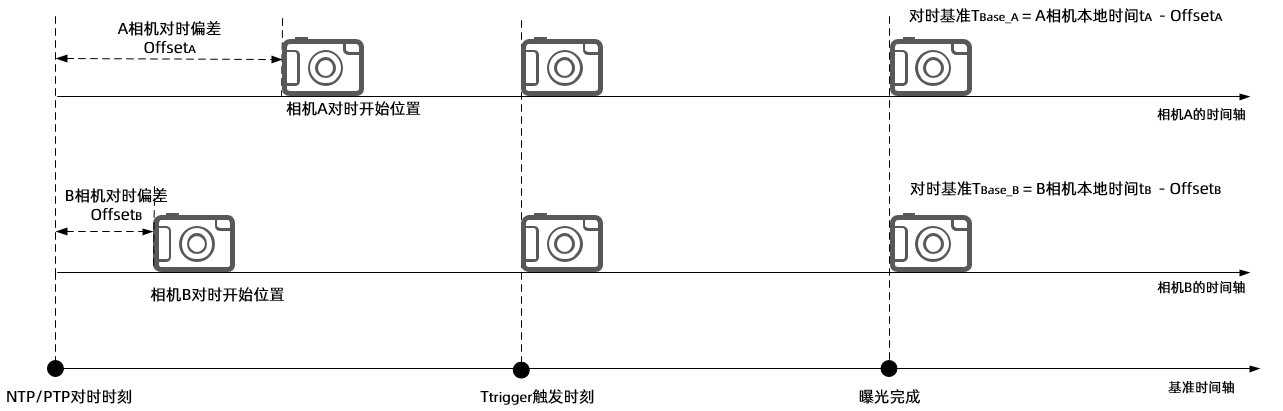
计算精度偏差:两台相机的时间精度偏差,就是它们在基准轴上的曝光完成时间差。
精度偏差▲T = 对时基准TBase_A – 对时基准TBase_B = (本地时间tA – 本地时间tB ) – (OffsetA- OffsetB)
精度偏差▲T = (本地时间tA – 本地时间tB ) /2。
接下来分别使用两台DS86和NYX650ToF相机,NTP/PTP不同对时测试。
测试步骤
1. 开启PC和相机的NTP或PTP对时功能
NTP对时配置:请参考《Goermicro 3D ToF相机的NTP功能设置方式介绍》。
PTP对时配置:请参考《Goermicro 3D ToF相机的PTP功能设置方法介绍》。
2. 硬触发曝光设置
使用ToF相机的硬件 IO 触发接口,通过外部控制器(如 PLC、工控机)使多台相机同时接收触发信号,捕捉曝光完成时刻的时间戳。
接线说明:多相机电源线上白色信号线接在同一个控制器的正极,黑色信号地线接在同一个控制器的负极。

3、获取一帧图像的时间戳
同型号多相机设置相同配置参数,下发硬触发信号,通过SDK接口获取设备一帧曝光后的时间戳。
NTP示例代码如下:
#define frameSpace 20
/*
省略部分代码
*/
for (int i = 0; i < deviceCount; i++)
{
    //设置硬触发模式
    status = scSetWorkMode(deviceHandle[i], SC_HARDWARE_TRIGGER_MODE);
    if (status == ScStatus::SC_OK)
    {
        cout << "[scSetWorkMode] success, ScStatus(" << status << ")." << endl;
    }
    else
    {
        cout << "[scSetWorkMode] fail, ScStatus(" << status << ")." << endl;
    }

    //设置NTP对时,对时设备IP:192.168.1.100举例
    ScTimeSyncConfig param;
    param.flag = 1;
    memcpy(param.ip, "192.168.1.100", sizeof("192.168.1.100"));
    status = scSetRealTimeSyncConfig(deviceHandle[i], param);
    if (status == ScStatus::SC_OK)
    {
        cout << "[scSetRealTimeSyncConfig] success, ScStatus(" << status << "). Set the device NTP server
        IP to " << param.ip << endl;
    }
    else
    {
		    cout << "[scSetRealTimeSyncConfig] fail, ScStatus(" << status << ")." << endl;
    }

}


for (int i = 0; i < deviceCount; i++)
{
			//从相机获取图像包
			status = scGetFrameReady(deviceHandle[i], 15000, &frameReady);
			if (status == ScStatus::SC_OK)
			{
				cout << "[scGetFrameReady] success, ScStatus(" << status << ")." << endl;
			}
			else
			{
				cout << "[scGetFrameReady] fail, ScStatus(" << status << ")." << endl;
			}

			//RGB图像举例
			status = scGetFrame(deviceHandle[i], SC_COLOR_FRAME, &colorFrame);
			if (status == ScStatus::SC_OK)
			{
				cout << "[scGetColorFrame] success, ScStatus(" << status << "). SC_COLOR_FRAME <frameIndex>: " <<
				colorFrame.frameIndex <<
				"  时间戳:  " << colorFrame.deviceTimestamp << endl;//打印设备时间戳
			}
			else
			{
				cout << "[scGetFrame] fail, ScStatus(" << status << ")." << endl;
			}
}
/*
省略部分代码
*/
PTP示例代码如下:
#define frameSpace 20
/*
省略部分代码
*/
for (int i = 0; i < deviceCount; i++)
{
    //设置硬触发模式
    status = scSetWorkMode(deviceHandle[i], SC_HARDWARE_TRIGGER_MODE);
    if (status == ScStatus::SC_OK)
    {
        cout << "[scSetWorkMode] success, ScStatus(" << status << ")." << endl;
    }
    else
    {
        cout << "[scSetWorkMode] fail, ScStatus(" << status << ")." << endl;
    }

    //设置PTP对时,对时设备IP:192.168.1.100举例
	  ScTimeSyncConfig param;
	  param.flag = 2;
	  status = scSetRealTimeSyncConfig(deviceHandle, param);
	  if (status == ScStatus::SC_OK)
	  {
		  cout << "[scSetRealTimeSyncConfig] success, ScStatus(" << status << "). Set the device PTP time
		 synchronization success." << endl;
	  }
	  else
	  {
		  cout << "[scSetRealTimeSyncConfig] fail, ScStatus(" << status << ")." << endl;
		  return -1;
	  }

}


for (int i = 0; i < deviceCount; i++)
{
			//从相机获取图像包
			status = scGetFrameReady(deviceHandle[i], 15000, &frameReady);
			if (status == ScStatus::SC_OK)
			{
				cout << "[scGetFrameReady] success, ScStatus(" << status << ")." << endl;
			}
			else
			{
				cout << "[scGetFrameReady] fail, ScStatus(" << status << ")." << endl;
			}

			//RGB图像举例
			status = scGetFrame(deviceHandle[i], SC_COLOR_FRAME, &colorFrame);
			if (status == ScStatus::SC_OK)
			{
				cout << "[scGetColorFrame] success, ScStatus(" << status << "). SC_COLOR_FRAME <frameIndex>: " <<
				colorFrame.frameIndex <<
				"  时间戳:  " << colorFrame.deviceTimestamp << endl;//打印设备时间戳
			}
			else
			{
				cout << "[scGetFrame] fail, ScStatus(" << status << ")." << endl;
			}
}
/*
省略部分代码
*/
通过上述方法可以多次测试同源帧图像的对时精度。
测试结果
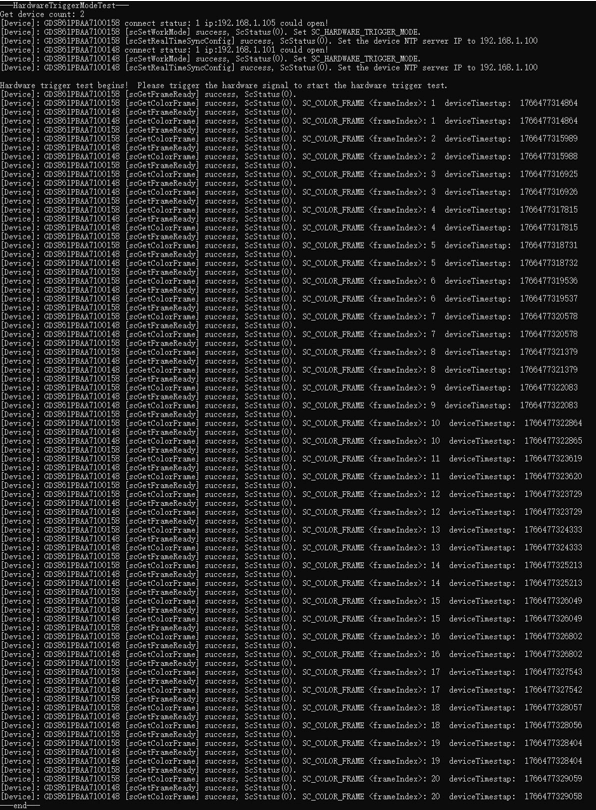
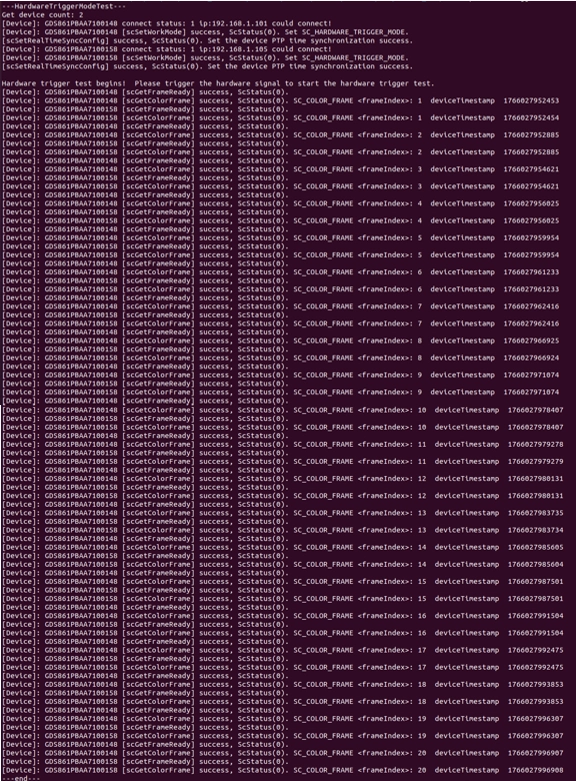
两台DS86相机NTP/PTP对时同源帧时间戳结果如下:
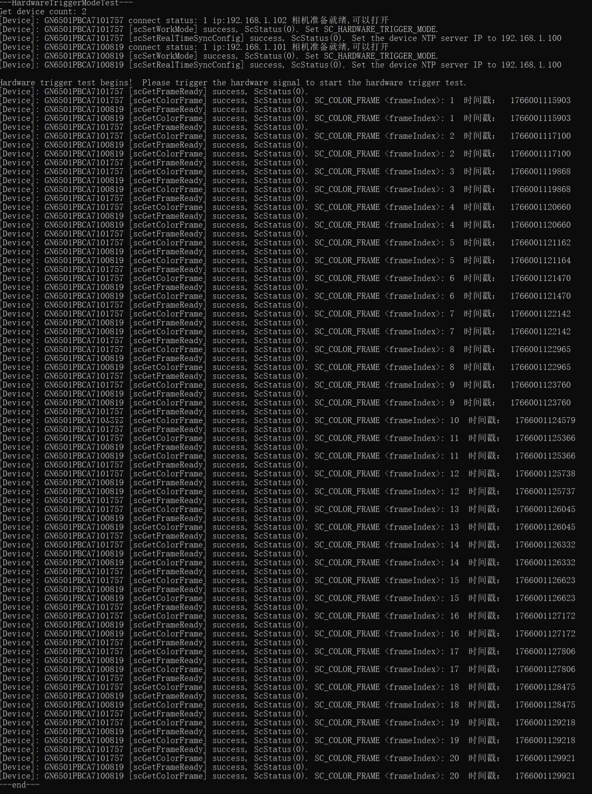
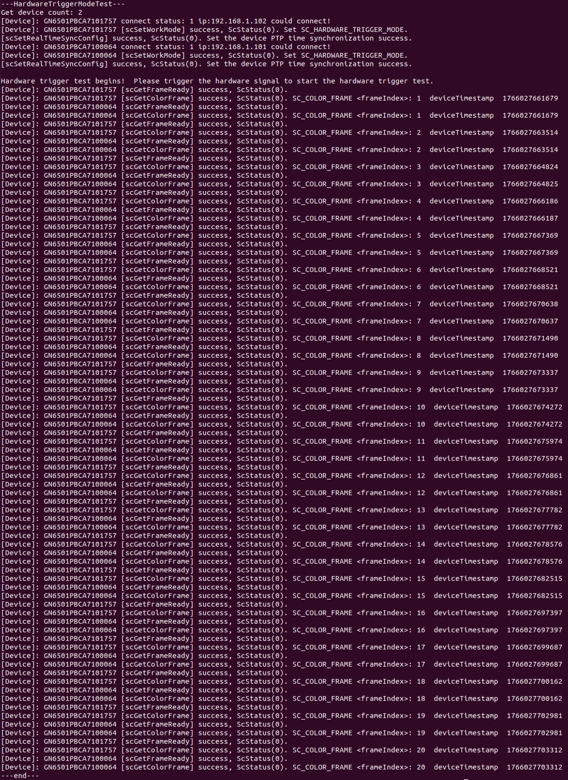
两台NYX650相机NTP/PTP对时同源帧时间戳结果如下:
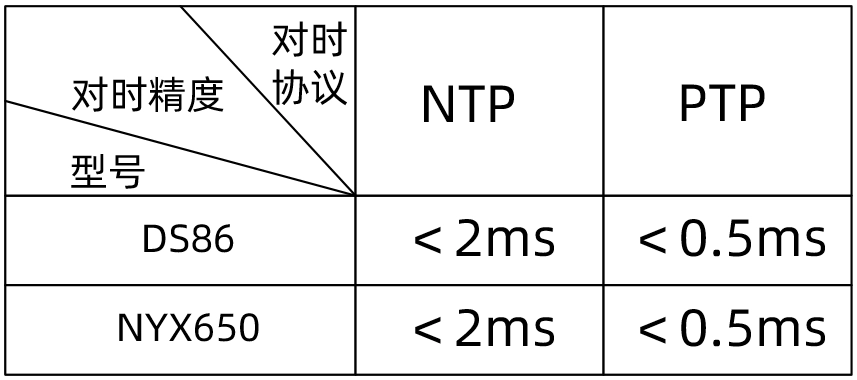
对时精度总结
由测试结果可知,DS系列相机和NYX系列相机在NTP/PTP对时精度如下:
连续工作模式的关键注意事项
图像帧号必须匹配:tA和tB必须是同一帧次的曝光完成时间(如第 100 帧的 A 和第 100 帧的 B),否则对比无意义;
偏差需实时更新:连续工作时,PTP/NTP 会周期性校准OffsetA和OffsetB,必须取与tA/tB同一时刻的偏差值,不能用初始对时的偏差。